Physical Address
304 North Cardinal St.
Dorchester Center, MA 02124
Physical Address
304 North Cardinal St.
Dorchester Center, MA 02124
WordPress started as a blogging engine to create blogs. As WordPress has gone more and more popular because of its ease of use, flexibility and beautiful user interface there was a need to make WordPress a platform for a wide variety of sites. WordPress as a platform now has great features which can be extended and customize to create a variety of sites with lots of different functionalities. By default, WordPress provides types like posts and pages.
In this article, we are going to see how we can use the custom post type feature to create additional custom types to extend the functionality of WordPress.
Now let’s start by registering a new custom type for our site. Here in this article we are going to create a plugin which will create a custom type for mobiles in which one will be able to store information about different mobiles he wants to display on his site.
To begin with please create a plugin folder in your wp-content\plugins\ called as customposttypedemo and in it create a file as customposttypedemo.php as shown below.

In the file customposttypedemo.php add the plugin header as below:
[php]
<?php
/*
Plugin Name: Custom Post Type demo
Plugin URI:
Description: Demonstrates how to use Custom post types
Author: Abbas Suterwala for DesignModo
Version:
Author URI:
*/
[/php]
Once you have done this you will be able to see your plugin in the plugin list in the WordPress admin. Once we see it there we can activate the plugin as see below:

Once our plugin is registered we use the register_post_type function provided by WordPress to register our Mobiles type.
The register_post_type takes two arguments to it which are the post_type and args which are the arguments which define the characteristic of the post type. There are a lot of arguments defined for register_post_type and a complete list can be found at Function Reference/register post type.
Now to register the Mobiles post type lets add the following code to our plugin:
[php]
add_action( ‘init’, ‘create_mobiles_type’ );
function create_mobiles_type() {
register_post_type( ‘Mobiles’,
array(
‘labels’ =&amp;gt; array(
‘name’ =&amp;gt; __( ‘Mobiles’ ),
‘singular_name’ =&amp;gt; __( ‘Mobile’ )
),
‘public’ =&amp;gt; true,
‘has_archive’ =&amp;gt; true,
)
);
}
[/php]
First we register the function create_mobiles_type with the init action of WordPress. Then in the function create_mobiles_type we use the function register_post_type to register our mobiles type giving it the arguments to display its plural name as Mobiles and its singular name as Mobile. Then we also specified the arguments to make this custom type as public show it will show up in the WordPress admin and it has archives.
Once we have added this code to our plugin and everything is right you should be able to see the mobiles menu in the left of your WordPress admin as seen below:

Now we can start adding new mobiles by clicking on add new.
When we register a custom post type by default it supports only title and the editor. So if we go to the Add New for mobiles we will only see the title and the editor. We can add many other things like excerpt, custom fields , thumbnails etc. which we want to add on our custom post type. To add these things on our custom post type we have ‘support’ argument on the register_post_type.
Now let’s update our register_post_type call as below:
[php]
register_post_type( ‘Mobiles’,
array(
‘labels’ =&amp;gt; array(
‘name’ =&amp;gt; __( ‘Mobiles’ ),
‘singular_name’ =&amp;gt; __( ‘Mobile’ )
),
‘public’ =&amp;gt; true,
‘has_archive’ =&amp;gt; true,
‘supports’ =&amp;gt; array(
‘title’,
‘editor’,
‘author’,
‘excerpt’,
‘thumbnail’,
‘custom-fields’,
‘revisions’,)
)
);
[/php]
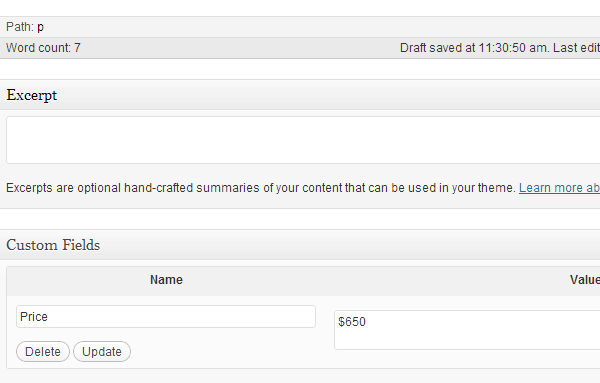
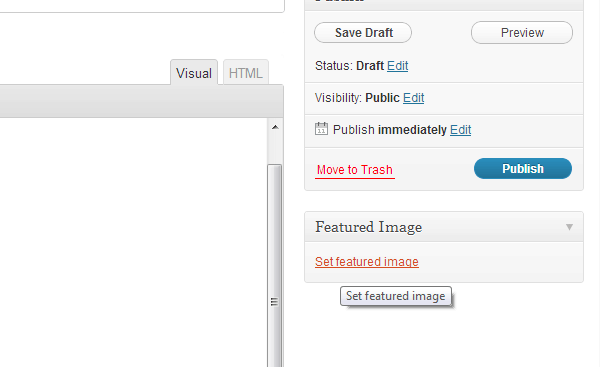
In the above call we add the support for excerpt, thumbnail, custom fields’ etc. Now if you go to you Add New page you will be able to see the excerpt and custom fields below the editor and set feature image to the right as shown below:


Now you can add an entry for you mobile giving its title, description. You can add a feature image for your mobile and add custom fields to it like for example Price and provide the value for it.
Once we have added the support for different functionality we can also add category and post tag support to your custom post type. This will be a great help if you want to assign different categories or post tag to you custom post type.
To add categories and post tag to your custom post type you can either add the taxonomies argument to register_post_type as below:
[php]
register_post_type( ‘Mobiles’,
array(
‘labels’ =&amp;gt; array(
‘name’ =&amp;gt; __( ‘Mobiles’ ),
‘singular_name’ =&amp;gt; __( ‘Mobile’ )
),
‘public’ =&amp;gt; true,
‘has_archive’ =&amp;gt; true,
‘supports’ =&amp;gt; array(
‘title’,
‘editor’,
‘author’,
‘excerpt’,
‘thumbnail’,
‘custom-fields’,
‘revisions’,),
‘taxonomies’ =&amp;gt; array(‘category’, ‘post_tag’)
)
);
[/php]
Or you can also use the function register_taxonomy_for_object_type to register different taxonomies to your post type. You can do that as follows in your init hook.
[php]
register_taxonomy_for_object_type(‘category’, ‘Mobiles’);
register_taxonomy_for_object_type(‘post_tag’, ‘Mobiles’);
[/php]
Once you have done that you will see the categories and tags below your Mobiles menu:

And when you do an Add new for your mobiles you will see your categories and post tag which you can associate to your Mobiles as shown below:

Once we have created the custom post type and from the WordPress admin added the different Mobiles which we want to add its time now to show your custom post type on the from end.
Now depending on the need of your site you might want to show your mobiles on the home page along with other blog posts. To do this you have to hook into the WordPress filter pre_get_posts which passes the query before actually executing the query.
So to show the custom post type on the home page add the following code to your plugin:
[php]
add_filter( ‘pre_get_posts’, ‘add_mobiles’ );
function add_mobiles( $query ) {
if ( is_home() &amp;amp;&amp;amp; $query-&amp;gt;is_main_query() )
$query-&amp;gt;set( ‘post_type’, array( ‘post’, ‘Mobiles’) );
return $query;
}
[/php]
In the above code we hook into the pre_get_posts filter and there we check if we are on the homepage and if this is the main query then we set the post_type on the query as post and also Mobiles. So now if we go and see the home page you should be able to see your mobile entries as shown below:

Also you might want to query for your Mobiles at any other place either in your theme files or some other place. In that case you can use query_post by set the post_type as Mobiles:
[php]
$args = array(
‘post_type’=&amp;gt; ‘Mobiles’,
);
query_posts( $args );
[/php]
If you are new to query_posts you can get more details about it on Function Reference/query posts.
Once you have got to display the custom post type on you site you might want the singles page for the custom post type to be different than that for normal posts. WordPress allows in your theme to have a separate single page for each post type. To do that you have to define a single-<post type>.php, so for us we will define single-mobiles.php. As I am using the default TwentyEleven theme I will make a copy of the single.php and name it as single-mobiles.php. You can do the same irrespective of the theme you are using.
Now in my single-mobiles.php I change the line:
[php]<?php get_template_part( ‘content’, ‘single’ ); ?>[/php]
to
[php]<?php get_template_part( ‘content’, ‘mobiles’ ); ?>[/php]
so that for mobiles type it starts fetching the content from the file content-mobiles rather than content-single.
Now we will create a file content-mobiles.php which is a copy from content.single.php. Once I have made the copy I just want to make the changes to display the price of the mobile which we have added as a custom field as shown in the custom field screen shot above. To do that I just add the following code below the call to the_content();.
[html]
<div class="entry-content">
<?php
the_content();
echo "Price: " . get_post_meta( get_the_ID(), ‘Price’, true);
?>
<?php
wp_link_pages( array(
‘before’ => ‘<div class="page-link"><span>’ . __( ‘Pages:’, ‘twentyeleven’ ) . ‘</span>’,
‘after’ => ‘</div>’
) );
?>
</div><!– .entry-content –>
[/html]
In the above code you get the post meta using the WordPress function get_post_meta. This function retrieves the meta value for a particular post id. For more details on get_post_meta you can visit Function Reference/get post meta.
Once you have added the above code and go to the permalink of your mobile entry you will start seeing the price there below the content as seen below:

WordPress as a framework has become very flexible and allows it to be customized in a variety of ways to be used for sites of varied functionalities and purposes. WordPress with custom post types allows one to add different types of content to ones site which are other than just posts and pages. You can have easily one or more custom post types which directly help to map and organize the content which you want to store and display on your site. WordPress also provides the flexibility and infrastructure to display different custom types at different places on your site and also lets you style them differently. So take full advantage of custom post types in the next WordPress site you build.